A fun side project for a great cause featuring Core Motion, SwiftUI, a little help from AI, and a pair of AirPods to count 100 push-ups a day.
The Inspiration
In April 2024, Cancer Research UK hosted a “100 Push-Ups a Day Challenge“, to raise awareness for cancer.
Cancer Research UK (CRUK) is the world’s largest independent cancer research organisation. It conducts research and provides information about cancer, running campaigns aimed at raising awareness and influencing public policy.
The organisation’s work is almost entirely funded by the public. It raises money through donations, legacies, community fundraising, events, retail and corporate partnerships.
Like many people today, I know people affected by cancer, which gave me motivation to participate. Additionally, with King Charles recently undergoing treatment, and Princess Catherine of Wales announcing her diagnosis, it’s certainly a cause at the front of many people’s minds.
Given my history, it shouldn’t come as a surprise that my first thought when signing up for the challenge was to look for an app that would help me stay on track, and to count the pushups I would be doing daily.
However, as is all too common these days, scrolling through the App Store I felt nothing but App Fatigue. App after app promised to “change my body in 90 days!”, be my personal fitness coach! Answer all my prayers! Instead, I just wanted something fun that would count pushups.
Fun for me means building something useful. So I set about to see if that was possible.
Exploring Core Motion
My first thought was how could I use sensor data? I came across plenty of examples of apps that worked by strapping your phone to you, or placing your phone somewhere strategically so that you could poke it with your nose on the way down. Or apps that used the camera or LiDAR to watch you rep it out.
I know that the Core Motion framework provides access to sensor data streams, and thanks to my quiet hobby of learning about esoteric Apple APIs (hello, CNLabelContactRelationYoungerCousinMothersSiblingsDaughterOrFathersSistersDaughter), I remembered the potentially useful CMHeadphoneMotionManager introduced in iOS14, back in 2020 when we were all trapped inside during the pandemic wondering if we’d ever be allowed to do push ups together again. And lastly, since it’s 2024 I naturally asked myself “Can I somehow use AI to solve this problem?”
Core Motion is an iOS framework that captures motion data from integrated device sensors, such as accelerometers, gyroscopes, and magnetometers. It’s used in fitness tracking, health monitoring, augmented reality (for precise positioning), and interactive gaming, among other things. It provides developers with essential data on acceleration, rotation, and fusion. Fusion data, which merges inputs from multiple sensors, offers a detailed interpretation of device motion. This enhances the accuracy and reliability of movement and orientation measurements, particularly useful for creating responsive and engaging user experiences.
Core Motion has been part of iOS since the operating system was renamed from “iPhone OS” back in 2010 at the release of iPad. To think, the latest and greatest iPhone back then was the iPhone 4 and the origin of the “you’re holding it wrong” meme.
And of course, because how you hold your phone is personal to you, the framework is privacy focused, and users must grant access to that data before it can be used in your app.
Applying AI
On to the next question of whether AI could help. First of all, of course it can. The real question is how.
There are plenty of apps on the App Store that use the AI embedded in frameworks like ARKit, which uses image processing to identify your body in the frame, analyse it, and determine whether you are using the correct posture or technique. While flexible, they also require you to position your phone camera at you. I didn’t want to go down that rabbit hole, and since these options already exist, they do not tick the box of “building something fun and useful”.
Instead, I wondered if instead an AI could help me build the idea that was starting to form in my mind. So I decided to train one. (As a matter of fact, I’ve trained several, which you are welcome to use!)
I started by training a custom GPT on Core Motion, and created a prompt to instruct it what to do with the information: how to reference, to be helpful, specific, concise and share its reasoning.
This enabled me to ask the GPT questions using natural language, and have it help me come up with solutions or specific API references, rather than trying to find a needle in a haystack.
Dancing About Architecture
The proposed architecture of the app forming in my mind was straightforward, yet effective:
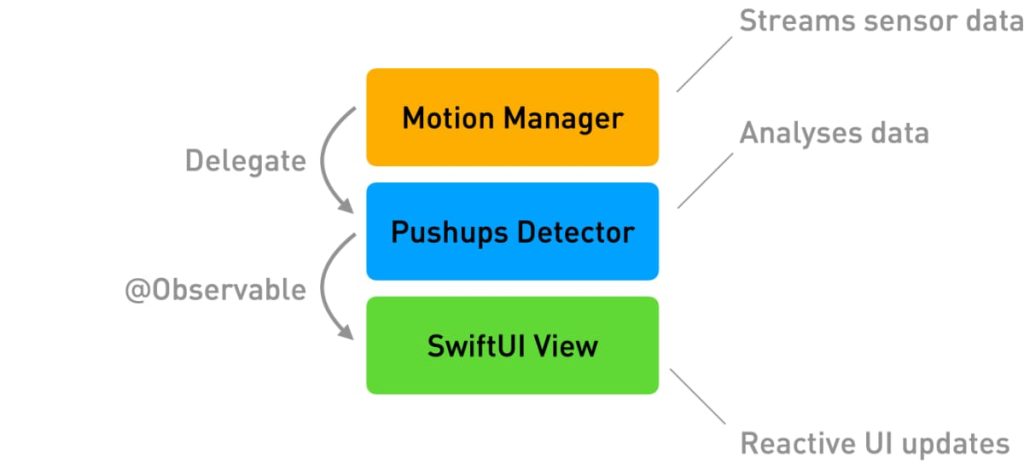
- Motion Manager: Streams sensor data and handles device sensor updates.
- Pushups Detector: Analyzes the streamed data to detect and count push-ups based on predefined thresholds.
- SwiftUI View: Provides a reactive UI that updates in real time as the user performs push-ups.
While simple, this architecture illustrates a separation of concerns that makes it easy to test, and easier to modify. Sure I could have wired everything together into a single .swift file but we aren’t savages.
Building the Motion Manager
The Motion Manager would be responsible for streaming sensor data. It would have to be able to start and stop sensor updates, handle initialisation failures, and provide updates to the values we’re interested in: pitch (for the user’s head) and acceleration along the y-axis (to detect dips and pushes).
Let’s see what that looks like, starting with a good old delegate pattern to access the updating values. With all the new hotness around new programming languages, it’s nice to know our old friends are still around:
import CoreMotion

protocol MotionManagerDelegate: AnyObject {
  func didUpdateAccelerationY(_ accelerationY: Double)
  fund didUpdatePitch(_ pitch: Double)
}
Next up, the class itself:
class MotionManager {

    private var motionManager = CMHeadphoneMotionManager()
    weak var delegate: MotionManagerDelegate?

    var isActive: Bool {
        motionManager.isDeviceMotionActive
    }

    var pitch: Double = 0.0

    var accelerationY: Double = 0.0

    deinit {
        stopUpdates()
    }

    func startUpdates() {
        guard motionManager.isDeviceMotionAvailable else {
            print("Device motion is not available")
            return
        }

        if motionManager.isDeviceMotionActive {
            print("Device motion is already active")
            return
        }

        print("[Motion Manager] Starting updates.")

        motionManager.startDeviceMotionUpdates(to: .main) { motion, error in
            guard let motion = motion, error == nil else {
                print("An error occurred: \(error!.localizedDescription)")
                return
            }

            DispatchQueue.main.async {
                self.pitch = motion.attitude.pitch
                self.accelerationY = motion.userAcceleration.y
            }
        }
    }

    func stopUpdates() {
        guard motionManager.isDeviceMotionActive else {
            print("Device motion is already stopped.")
            return
        }

        motionManager.stopDeviceMotionUpdates()

        print("[Motion Manager] Stopped updating.")
    }
}
It’s not going to win any awards, but the key responsibilities are there. If you spotted any errors, congratulations you are a senior developer.
Oh yeah, here’s a little trick we can add: use didSet to notify the delegate of updates:
var pitch: Double = 0.0 {
  didSet {
    delegate?.didUpdatePitch(pitch)
  }
}

var accelerationY: Double = 0.0 {
  didSet {
    delegate?.didUpdateAccelerationY(accelerationY)
  }
}
Building the Pushup Detector
There are 2 hard problems in computer science: cache invalidation, naming things, and off-by-1 errors.
Leon Bambrick
The Pushups Detector is responsible for… I probably spent more time than necessary thinking about what to name the components of the app, and I’ve gotten pretty good at this. But I’ve found it to be true that once you decide what to call something, all the follow-up decisions about what it should and shouldn’t be responsible for tend to answer themselves.
So the Pushups Detector introduces the concept of a “session” that can start and stop. This doesn’t relate to a workout, but rather a session of analysing the data stream provided by the Motion Manager.
Being a detector, it’s also responsible for interpreting the raw data from the Motion Manager, such as whether the person is in the prone position or not (this is useful for determining whether we should be counting pushups or not, for example if they are standing or vertical).
We’ll use some basic data science techniques like thresholding to detect dips and pushes, and to evaluate whether or not to increment the count. The Pushups Detector also manages the count. If you think that belongs in a separate object, be my guest. There are no wrong answers in shipping apps.
The Code
Let’s look at some code, starting with some new Observable SwiftUI hotness:
import SwiftUI


@Observable class PushupsDetector {

    private let motionManager: MotionManager

    /// Whether or not there is an active session.
    var isActive: Bool = false

    /// The number of pushups counted in the active session.
    var count = 0

    /// The athelete is in the correct position for a pushup
    var isValidPosition: Bool = false


    init() {
        self.motionManager = MotionManager()
        motionManager.delegate = self
    }

    deinit {
        endSession()
    }


    func startSession() {
        print("Starting session…")
        motionManager.startUpdates()
        isActive = true
    }

    func endSession() {
        motionManager.stopUpdates()
        isActive = false
        print("Session ended.")
    }

    func incrementCount() {
        count += 1
    }

    func resetCount() {
        count = 0
    }
}
There’s really not too much to talk about that isn’t pretty self-explanatory here.
The Pushups Detector inits a Motion Manager when it’s created. Starting and ending a session essentially starts and stops the Motion Manager updates.
We can add some properties for our thresholds, and whether we think the user is actively performing a pushup. For now, we’ll just put in some guesstimates, and see what happens later:
private var isPushupPhase = false

private let downThreshold = -0.5
private let upThreshold = 0.5

private let proneThreshold = -1
The Delegate
The real magic of the whole app is in the delegate handlers:
extension PushupsDetector: MotionManagerDelegate {

    func didUpdateAccelerationY(_ accelerationY: Double) {
        if accelerationY < downThreshold && !isPushupPhase {
            /// The user is moving downward in a push-up
            isPushupPhase = true

        } else if accelerationY > upThreshold && isPushupPhase {
            /// The user has moved back up
            incrementCount()
            isPushupPhase = false  // Reset the phase to detect the next push-up
        }
    }

    func didUpdatePitch(_ pitch: Double) {
        isValidPosition = pitch < proneThreshold
    }
}
As acceleration data streams in, it crosses a threshold on the way down, and again on the way back up.
We can also check for the user being in the prone position (lying flat, facing downwards) by seeing if the pitch value is lower than our threshold.
A little trial and error shows us that CMHeadphoneMotionManager is calibrated pretty logically, giving you pitch = 0 when you’re wearing AirPods and looking forwards, -1 if you are facing the ground, and +1 if you are lying down facing the sky. Standing and looking up is +0.5 to +0.7 depending on how attached your head is.
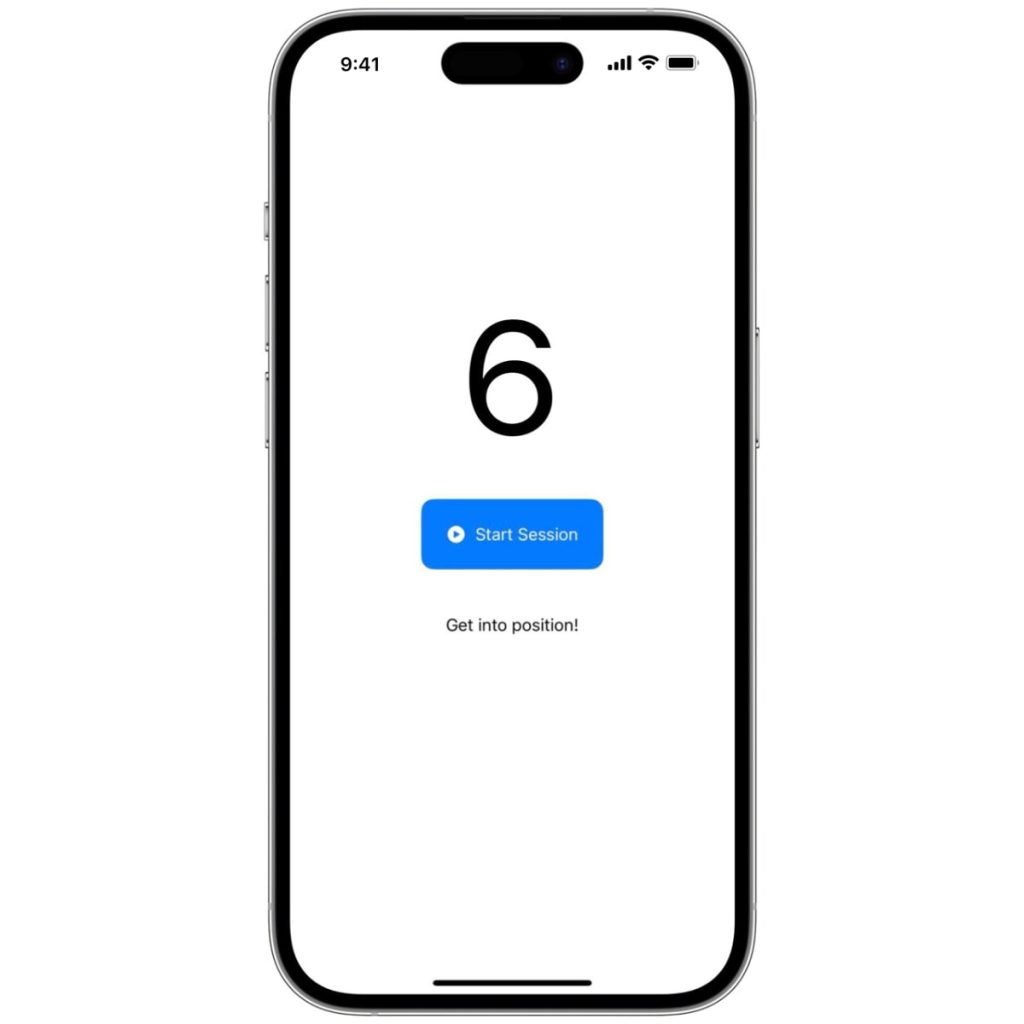
Building the View
The last piece of the puzzle is the UI. We don’t even know if this is going to work yet. Let’s spend our energy on figuring that out, instead of getting excited about how awesome it’s going to look. More on that later, because it turns out you don’t really need to look at anything to do a pushup…
For now, we probably want to provide the person doing pushups a way to start and stop motion detection. And displaying a count as a nice big number probably makes sense. Lastly, since we have it, we can provide some kind of indication whether they are in the prone position or not — although they are probably aware of that without looking at a screen. We hope.
The point is: keep it simple.
And now for some code:
import SwiftUI

struct ContentView: View {
    @Environment(PushupsDetector.self) private var pushupsDetector

    var body: some View {
        VStack(spacing: 40) {
            Text("\(pushupsDetector.count)")
                .font(.title)

            Button(action: {
                if pushupsDetector.isActive {
                    pushupsDetector.endSession()
                } else {
                    pushupsDetector.startSession()
                }
            }) {
                Group {
                    if pushupsDetector.isActive {
                        Label("End Session",
                              systemImage: "stop.circle.fill")
                            .foregroundStyle(.white)
                    } else {
                        Label("Start Session",
                              systemImage: "play.circle.fill")
                            .foregroundStyle(.white)
                    }
                }
            }
            .padding(22)
            .background(.tint)
            .clipShape(.buttonBorder)

            if pushupsDetector.isActive && pushupsDetector.isValidPosition {
                Text("Good position!")
            } else {
                Text("Get into position!")
            }
        }
        .padding()
    }
}
Apparently this is better than UIKit.
Diving Into Data
Once all of that was figured out, it was time to build and run! And do some pushups!
Adapting the sensor data for push-up detection posed several challenges. The key was in fine-tuning the data interpretation algorithms to recognize the specific movements of push-ups accurately. Using Swift Charts, I visualized the raw sensor data to identify patterns and adjust thresholds for detection precision.
Sorry I didn’t keep the code for this, but essentially it involved buffering 100-300 data points into an array, then just feeding that to a Swift Chart. Maybe a dozen lines of code in total:
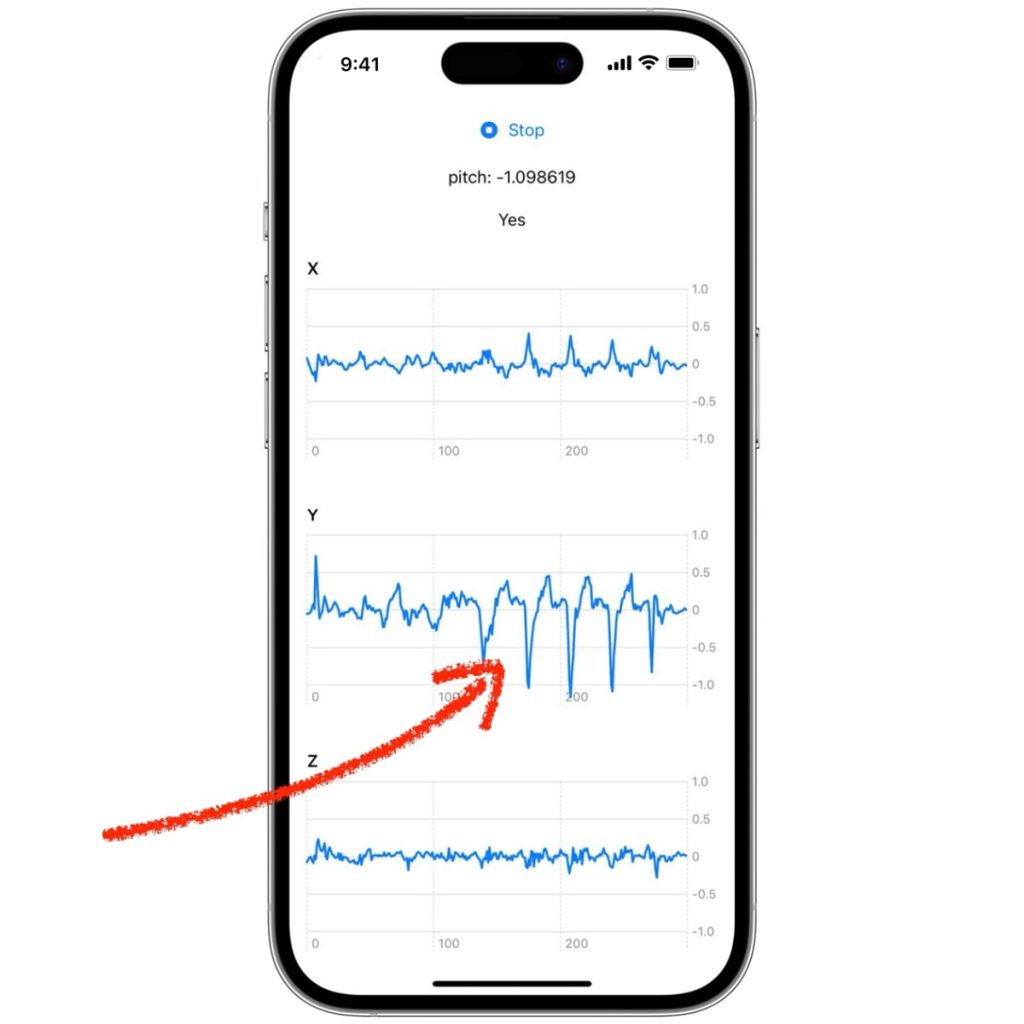
Not pictured: Me doing pushups to generate that data.
I was relieved to see a clear pattern in acceleration along the y-axis. The spikes downward to -1.0 are the dip of the pushup, and when I came back up, acceleration would spike to roughly +0.5. It’s this pattern that we’ll use to define a rep, and discount anything else.
Fine-Tuning
The next step in basic data science is adjusting the initial thresholds based on observed data, so a -1 negative y-acceleration followed by a positive +0.5.
Of course, the only way to validate this is to do some real-world testing, and further adjustments.
Many, many… many… push ups later, I settled on some fine tuned values of +0.4 and -0.7 to improve accuracy. The original values proved too specific to hit, and I ended up doing many reps that weren’t counted. Since we’re observing acceleration, each rep needed to have a bit of enthusiasm to it — moving too slowly would not count the rep. Sorry, Rooster.
The Magic of Real-Time Tracking
Bringing it all together for the moment of truth:
You use the whole thing by just putting in a set of AirPods, tapping start and pumping some reps. There’s zero interaction needed, and as you can see from the video above, you don’t even need your phone near you.
Real-time tracking feels like magic. The app, while simple in design, allows users to perform push-ups while the app monitored their movements through AirPods, updating counts automatically without any manual input.
Reflections
This project not only reinforced the importance of early validation and iterative improvement but also highlighted the personal satisfaction and fun in building something meaningful.
There are plenty of rough edges: I haven’t even covered counting 100 pushups per day over multiple days, or improvements to the user interface.
One addition to the UI that I did implement was audio feedback. With AirPods in your ears, and your phone out of sight while you face the ground, an audible confirmation was an obvious addition — and a reminder that not all user interfaces are visual.
Conclusion
By combining Core Motion, SwiftUI, and AI, I developed an app in under 24 hours that brought a new dimension to fitness tracking. This experience was a great reminder of the potential of technology to transform everyday activities.
While it seems like there are amazing new technologies being created every day, the challenge will always be how we can apply them to the problems we face.
If you enjoyed this post, consider donating to Cancer Research UK and help them make a difference. While the push up challenge is over, the fight against cancer is not: click here to make a contribution.